I was looking around Etsy this morning and saw a couple of new shops that needed help. With that in mind I started writing. I have a few shops….PatternHaus is my newest but the others, GoofingOffSewing, MissEileen (vintage), and MetalWoodsnWater have over 2500 sales. Not huge but I learned a little bit to share with others.
Congratulations on your decision to work for yourself. Remember though, it is work. You just became a business owner.
Pictures
You need good ones. All angles. If you knit, consider a model. Maybe on a baby, maybe on a doll. Do you paint? Show how it could be displayed. Think how the buyer would use the item and try to get a picture of it. Use all 5 slots for the pics.
Pictures are always a work in progress for me.
Listing titles
Baby stuff tells little about your items except it is for babies. Check out what other sellers (the most successful one) call their items to get ideas. As a seller, you need something that will attract my attention. Remember, you have a lot of competition.
Listing
Describe the item…ex: "Handmade baby sweater, leggings, and matching hat made of soft, cashmere yarn." Remember to add the size, the fabulous pattern or stitch you used and if it was crocheted or knitted. Describe the color…lemon yellow, cocoa brown, mint green…whatever. Remember the buyer is using your description and not their hands to decide it he or she wants to purchase your item.
Variations
Use the variations for more than sizes. If you offer a sweater set in different colors show the colors in your listing. Take pictures of the yarn to give people a choice.
Make more than one listing.
The more listings available, the better the chance of selling. Don't use one listing for everything in your shop if the items are different. For Example: Separate hats from the sweaters. Show one in a few close ups, maybe use one a model, and then the one with all the different colors….then use the color variations. Price the hats separately from the sweater sets. They deserve their own space. So does blankets. Consider booties as a separate listing. A successful painter uses one listing for prints, one for magnets, and another for pendants….all of the same painting, all with different price points.
Shipping:
You don't ship for free. Weigh your items and decide if they need special handling or not. Think about the use of Flat Rate Envelopes from USPS. Shipping in the US should be $5.70 using USPS Priority Flat Rate Padded envelopes and insurance is included. USPS will send them to you free of charge. How about First Class Shipping? You can ship up to 16 ounces using First Class and it takes 2-4 days….and the pricing is reasonable. If your items are pre made give a turn around time that you can keep up with, maybe 1-3 or 3-5 days. Stop at the store and get some gift wrap tissue (white is the least expensive) to wrap your items and zip lock bags to put them in if they are small. Think about using special packaging as you grow. Buy adhesive labels so you can write your shop name on them and label the bag. Maybe stickers? There are places that will make them to fit your business.
Get your shipping things ready before you have a sale.
Label your work
If you sew, knit, or crochet, consider having labels made to sew into your work. There are folks who will make them for you. I'm not sure how much they cost but it will give your items a professional look. Make labels on your computer or order some.
Custom Work
If you make something custom, give the customer an idea of how long it will take. Take pictures of the work in progress and keep in touch with them. Work with the customer so they will remember you and the wonderful work you did for them. They will appreciate the updates.
There's probably a lot more I haven't touched on but this is a start.
Have patience and good luck.
Showing posts with label diy. Show all posts
Showing posts with label diy. Show all posts
Monday, August 25, 2014


Thursday, August 7, 2014
DIY Map Decor
 |
| Map Fabric Panel |
While packing and shipping my beautiful map fabric (sold in the GoofingOff shop..sorry, but a girl's got to blow her own horn sometimes) I started thinking about the things that could be made with map fabric. Sure, a person can hem the panel, sew loops on it, and hang it for …you guessed it… a map. Great idea if you are planning to teach far away since it folds up nice and doesn't tear like paper does. Still….there should be more so I looked what other crafty folks are up to and came up with these ideas.
 |
| DIY Map Artwork |
Here's an idea from Martha Stewart (or the folks who work with her). These maps are paper but why not use fabric and frame it?
 |
| Map Decorator Pillow |
Catherine Holcomb from Mapology, makes these wonderful map pillows. The fabric lends itself well to throw pillows or pillow cases.
 |
| Map bunting |
Amy Mahon, from Chezlele, not only makes map pillows but map bunting, too.
 |
| Map picnic blanket |
The Domestic Goddess (hail) made this picnic blanket using the map fabric, a vinyl tablecloth, and scraps. Check out her tutorial to learn how she did it.
I'm sure there's a lot of other things to do with the fabric…curtains, shower curtains, tote bag (I love totes…can't stand to use plastic bags). Maybe not a shirt, though…depends how you place the countries…."Er, excuse me, you have Beijing placed over your"…..
Post by Eileen Patterson….GoofingOff
Saturday, May 31, 2014
How to Make A Dog Bone Pillow Chew Toy

I started thinking about something I could design and sew fast without too much hassle. Dog Bone!! Out of denim scraps!
Using some wrapping paper I created a pattern. I used a dog biscuit for a guide, only making it bigger.

The full length of the bone is 10 inches. It is 5 inches across the center. I used a can to make the round ends.
 Use some heavy duty fabric for the bone. In my case, I used some brown denim fabric from my stash and traced the pattern on it.
Cut the pattern from the fabric creating a 1/2 inch seam allowance.
 Sew along the line....straight stitch, nothing fancy.
  Remember to leave an opening along the straight part of the bone so it can be turned right side out. Make sure its on the straight part; it'll be easier to stitch close.
 The the stitching was complete I snipped around the curves so the bone would hold its shape when being turned inside out.
  The pillow was then stuffed with fiber fill.
The pillow opening was then stitched closed with hidden blanket stitches. Why hidden? Just in case Miss Sweet Boxer Puppy decided to take out the stitches.
Dog Approved!
Post by Eileen Patterson of GoofingOff Sewing Supplies.
Friday, May 30, 2014
Motor Home Redo

I love my hubby...really, I do. He appreciates my creativity and talent. He is forever finding me things to make, embellish, or add to my pile of things to do (usually the case).
This Mother's Day the hubby surprised me. Instead of a bouquet of flowers or a piece of jewelry he bought me a motor home. Really. A 32 foot Holiday Rambler. Talk about a surprise. He spotted it at a friend's a while back and fell in love with it. I should have known something was up but didn't until he drove it down our driveway tooting the horn to announce the arrival of my gift.Impressive.

Big.

The first thing to do was to get rid of the old mattress (the former owner wanted it back, thank you). And clean the inside (thank you, a young friend). A couple of things off the huge list that comes with a motor home redo.
I still have to decide on colors (neutral would be best...earth tones...not white...hubby likes gas, grease and oil too much). Wood accents? I have a pile of cherry from a tree we cut a while ago.
We had company over the Memorial Day holiday weekend and found out our inflatable mattress fits perfectly on the bed. We also found out the air conditioner works. Phew! Good news for sure.
Things that will have to be fixed up or replaced:
floor (hardwood going down)
curtains
stove
backsplash
headliner
cabinets?
refrigerator (good cleaning)
seats
cushions for the dining table
throw for the sofa
bed linens and curtains for the bedroom
I'll keep you posted.....Step by step.
Wednesday, March 19, 2014
Pattern Weights
I am getting in the mood to sew….that might take a while as I get in the right frame of mind…some holiday scrub tops. Yes, Christmas and Hanukkah tops. Yes, I know the holiday is over but it will be back and once again I will be without a holiday scrub top to wear. Besides, holiday fabric is cheap now and my holiday to-do list is empty right now….it won't be that way in October or November. So.. being the totally organized person I am (quit laughing) I am assembling the things I need to make the tops. Pattern…check….thread…check…fabric…check….pains..I mean pins..wait, there's got to be a better way…how about pattern weights?
So I looked on the web for some ideas and here's a few I came up with:


So I looked on the web for some ideas and here's a few I came up with:
 |
| Washer Paper Weights from Pin and Paper |
Maybe now that they are pretty people won't think they're so weird.


So, what do you think? Are these not the bomb? OK, still great ideas. What did I decide on? I'm the queen of the thrift shops so the thrift quilt squares, of course, and since I had a bag of aquarium gravel handy (who doesn't) that's what I used to fill them with.
Monday, November 26, 2012
Free Mitt Potholders Pattern: Gift to Crochet
I was going through my stack of vintage magazines and found this pattern in a Woman’s Day from the 1970’s.

They are called Handy Mitt Potholders and would make a great last minute gift for the cook on your list.
Size: 8 1/2 inches from lower edge to top.
Materials: Aunt Lydia’s Heavy Rug Yarn (rayon/cotton)
For solid-color mitt: 1 (70 yard) skein each peacock No. 740 and spring green No. 605. For Striped mitt: 1 (70-yard) skein each peacock 740, spring green No. 605, brown No. 420, phantom red No. 140 and cerise No. 115. For both mitts: Aluminum crochet hook size G (or international 4.5 mm).
Gauge: in pattern st 5 groups = 3 inches, 3 rows = 1 inch.
Striped Mitt: Starting at wrist edge with peacock, ch 17 to measure about 5 1/2 inches. 1st row: In 3rd ch from hook work 1 sc and 1 dc (1st group made), * skip next ch, in next ch work 1 sc and 1 dc. Repeat from * across (8 groups); ch 1, turn.
2nd row: *Skip dc, in next sc work 1 sc and 1 dc. Repeat from * across, ch 1, turn.
Repeat 2nd row 4 times more. 7th row: Work across in pattern, ch 3 at end of row. Mark this edge for thumb. 8th row (thumb inc): In 3rd ch from hook work 1 sc and 1 dc, continue across row in pattern as established; break off peacock, attach green; ch 1, turn.
Working in pattern with green, work even on 9 groups for 3 rows more, ending at marked edge. Do not ch 1 at end of last row. Break off green, turn.
Next row; Make lp on hook with brown. Skip 1st 2 groups, work 1 sc and 1 dc in sc of next group, continue across in pattern to end of row (7 groups); ch 1, turn. Working even in pattern on 7 groups, work 1 row more with brown, 3 rows with red and 3 rows cerise.
Next row (dec row): With cerise, work in pattern across to within last group, work 1 sc in sc of last group; ch 1, turn. Following row (dec row): Skip 1st sc, work 1 sc and 1 dc in sc of next group, work in pattern across to within last group, work 1 sc in sc of last group; ch 1 turn. Repeat last row twice more, omitting ch 1 at end of last row. Break off.
Thumb: 1st row: Make lp on hook with brown. Starting at outer edge, work in pattern st across free green sts (2 groups); ch 1, turn. Continue in pattern on these 2 groups only for 3 rows more. 5th row (dec row): Skip 1st de, draw up lp in each of next 3 sts, y o hook and draw through all lps on hook. Break off. With brown, work 1 row sc evenly on all edges of thumb sts. only. Break off.
Second Side of Mitt: Make another pieces in same manner.
Finishing: Edging: with red, work 1 row sc all around edges, except wrist edge, of both pieces. Joining: With red, sew both pieces together from the right side. Wrist Edging: With red, work around wrist edge as follows: Work 2 sc in each sc around. Break off. Loop: Attach red with sl st to wrist at seam edge and crochet 2 inch chain. Sl st in each st of ch. Sew end of ch to mitten to form loop.
Solid Color Mitt: First side of Mitt: Using only peacock: work as for striped mitt.
Second side of Mitt: Using only green, make another piece in same manner.
Finishing: Using only green, work as for striped mitt for edging, wrist edging, joining and loop.
A pattern like this can be modernized using “now” colors and different yarn. Try two strands of thick eco-friendly cotton yarn or maybe make your own yarn out of old t-shirts.
Post by GoofingOff
Peace, love, and Happy Stitching!
Sunday, April 15, 2012
Free Tatting Flower Pattern
Do you tat? Are you thinking of taking it up? Well, here’s a pattern I found in that old loose leaf notebook I bought at a thrift shop a while back.

Cute little white flowers with yellow centers. The pattern originally came from the March, 1979 issue of Better Homes and Gardens. The flowers are oh-so-delicate and sweet. Here’s the pattern as it was in the magazine. It includes abbreviations, a brief history of tatting, and a pattern for the doily, too. Enjoy…..and don’t forget to drop me a line to let me know how the flowers come out. I’d love to hear from you.

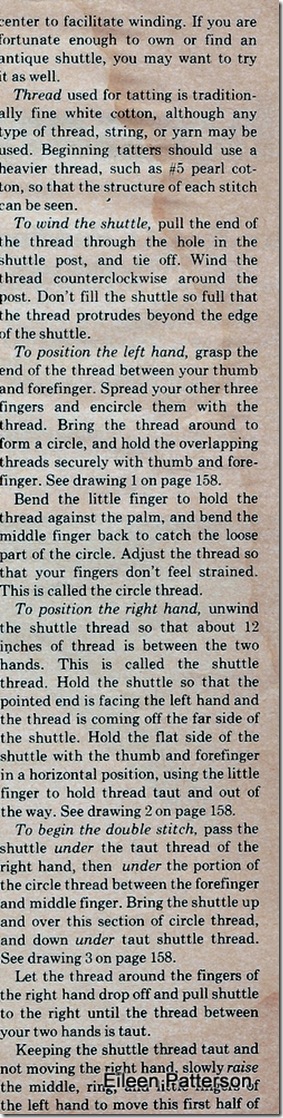
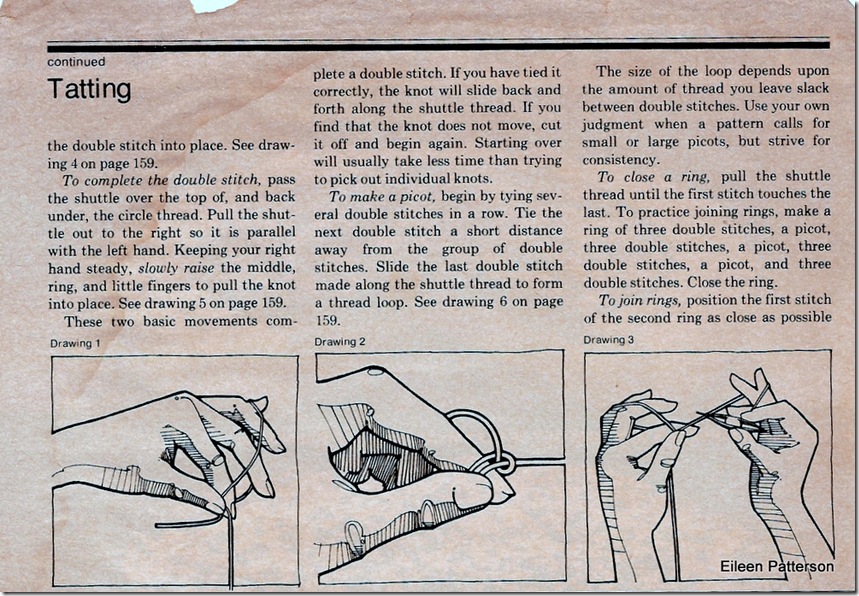


Cute little white flowers with yellow centers. The pattern originally came from the March, 1979 issue of Better Homes and Gardens. The flowers are oh-so-delicate and sweet. Here’s the pattern as it was in the magazine. It includes abbreviations, a brief history of tatting, and a pattern for the doily, too. Enjoy…..and don’t forget to drop me a line to let me know how the flowers come out. I’d love to hear from you.


Wednesday, June 15, 2011
What do you do with 2000 Coffee Filters?
A friend of mine discovered Sam’s Club. She came to work so excited and proceeded to tell me about the great deals she found. Then she said, “the coffee filters were so cheap. We bought a case of them for $12.” Stopped me dead in my tracks. I was left with a few questions running through my head like “How many filters were in the box?” and the all important “What do you do with 2000 coffee filters?”
Well, she found a few uses for them and since I was curious, I found a few, too. She uses them for cleaning windows (I like to see outside but that wasn’t what I had in mind) and I use them to cover food in the nuker but I thought there just had to more, crafty uses for the other 1998 of the filters she had in the box.
Aunt Peaches made these incredible flowers out of coffee filters! …..I just knew someone did these things. I could feel it (that 6th sense of mine). Click Here for the tutorial. I think they are awesome. Might have to try some.

Here’s a coffee filter wreath from the Nesting Place. I think it looks gorgeous! Click HERE for the link.

Check out this light fixture from Parlour. That one hanging from the ceiling. Awesome. Go here to read how she did it.


More flowers but this time roses from TheLittleBrownHouse.US Click Here for the tutorial. Aren’t they gorgeous?

How about a coffee filter lampshade?

This tutorial is from NorthwestHospitality.org Fabulous! Click here to find out how it’s done.
Well, that’s a few ideas to keep her busy. They look pretty good, too.
Gotta go. Don’t forget to vote. I won’t tell who’s winning but make sure you vote for your favorite.
Post by Eileen of GoofingOff Sewing Supplies etsy & artfire, MissEileen, and MetalWoodsnWater.
Monday, February 21, 2011
Crocheted Water Bottle Cozy

I am in the mood to crochet. Like other crafty people, I know how to do a number of different crafts. I’m not really an expert at any but I can do a few things. I know how to knit a little, crochet a bit, and sew. My problem is I get distracted easily. I need to create when the mood is right. The pattern has to be challenging enough to get me interested but not too challenging to make me give up.
I have always been a recycler. I don’t like waste and plastic bottles of water make me cringe. I still buy them but cringe. I do have a refillable water bottle, though and thought it would be a great idea to get water bottles for my sisters and make holders to go with them. Since I am in the crocheting mood, it seemed a natural to buy some yarn and start hooking.
I used Peaches & Creme cotton yarn for each bottle. Each bottle uses a little less than 1 ball. I tried to complement the color bottle with the yarn. It’s been a while since I crocheted anything so I went to WikiHow to get me started.
Like the WikiHow article, you make a disk for the bottom of the bottle. Chain 6 stitches, slip stitch (sl st) to make a circle, and Rd 1 single crochet (sc)6 stitches into the circle. Rd 2 chain 2, then 2 sc into every stitch (total of 12 stitches in the 2nd rd), join the 11th stitch to the top of the chain with a sl st. Rd 3: Ch 2, *1 sc into 1st st, 2 sc into next st, continue until you reach the chain, sl st at top of chain. Rd 4: Ch 2, *1 sc in next 2 st, 2 sc into next st, continue until you reach the chain, sl st at top of chain. At this point the disk is probably big enough to fit the bottle, if not, crochet another round increasing the number of stitches with each round.


Once the disk is complete the creativity starts. You can use a simple sc stitch the entire way up until the cozy is tall enough. Simple sc lends itself well to embroidery or flowers. The one I made for my sister is done with a row of popcorn stitch alternating with 2 rows of half double crochet.

The handle starts with a chain of 40 stitches. I sc down 2 rows from the top and made a chain of 40 stitches. I then sc in each stitch of the chain and sc the end of the handle to the cozy to make it secure.

Here’s a picture of the completed cozy.

Just weave the loose threads in and it is done. Takes a few hours from start to finish. Good to do while watching TV or listening to music. Best of all, if I am stitching I’m not eating.
I liked making the cozies so much I made one for myself.

Simple single crochet stitch, scalloped trim at the top, and a crocheted flower for a little bit of embellishment.

Abbreviations: Rd: round, sc: single crochet, hdc: half double crochet, sl st: slip stitch, ch: chain, st: stitch.
My thanks to Dvortygirl, Lois Wade, Krystle, Eric, and anyone else involved in the article. http://www.wikihow.com/Crochet-a-Water-Bottle-Cozy
Post and patterns by Eileen Patterson of GoofingOff.etsy.com and GoofingOff.Artfire.com
Sunday, November 21, 2010
11.21.2010 New Listings from Goofing Off
A friend of mine is getting married in May. I am so happy for her. Everything is coming together so well. She hunted for months for the right dress and finally found it. All that hunting made me think of all those brides-to-be who have visions of the dress they are looking for and can never find the right one leaving them to settle for what they can find.
Simplicity 9421 allows the dressmaker to design her own dress. Not so crazy and what a great idea. If you want a full skirt, do that. If you are looking for a close fitting skirt, that’s OK, too. Sleeves, ruffles, frills, sleek; it’s all up to the maker to decide, and all in one pattern. Nice. Comes in sizes 12-16, bust 34-38. Pattern is uncut and complete. Take a look.

The other pattern just listed melts my heart. From the 1970’s, Simplicity 7931 Peasant blouse. Was I a hippie? What do you think? Peasant blouses and long skirts, handmade, of course. This pattern has four variations and comes in size 14, bust 36. It’s been used but it is complete.

Blog post by Eileen Patterson of GoofingOff.etsy.com and GoofingOff.artfire.com.
Subscribe to:
Posts (Atom)