Monday, September 26, 2016

Fourteen Easy to Sew Costumes for Halloween

Halloween is still a month away but time will fly as quick as bats from a haunted house. Finding and buying a ready made costume takes time and can be expensive, especially when you need costumes for more than one. These costumes are fairly easy to make letting you get out of the store and take part in the fun. 

Sunday, September 25, 2016

Easy to Crochet Gifts for the Holidays

I realize it's still September but even if I don't like seeing Christmas lights up before Halloween I do like to get some gifts made before the cookie baking and ornament hanging begins. Here's some patterns to crochet for gifts to get a head start on the holidays.


 Crochet Christmas
Christmas Crochet has patterns for these cute little carolers and....

these adorable snow man and lady rattle toys. How about the mouse and puppy? Oh so cute!

Hooked on Crochet has some challenging patterns but it also has some great ideas that will work up pretty quick. The ripple afghan can be done in any colors and would be appreciated on cold winter nights. 


The fishing bear on the bottom would make a cute Teddy for someone and those golf club covers are too darned cute! A think they could even become puppets for a show.

And how about this bed jacket? Any color would work. It could even become a little shawl for a fancy dress when worked in the right yarn. 


OK, so I am a sucker for cotton crochet yarn. It works up quick and has a nice feel to it......and since I am always looking for hot pads for the table these patterns are a given. I love them! An H hook and a ball of yarn and I am in my happy place. The Jack O' Lantern is adorable and the poinsettia (below) would look good on a holiday table. 


Well, that's all for now. I'm still adding more to the PatternHaus shop so stop by. There are more patterns....crochet, knitting, needlepoint, cross stitch, and embroidery.....to get your creative juices flowing before the holiday crazies start. 

Post by Eileen from GoofingOff Sewing, PatternHaus, and Miss Eileen's Vintage. 

Thursday, September 1, 2016

Tropical Storm Hermine Rain and More Rain

Living in Florida, the Sunshine State, means we don't always have sunshine. Sure, lots of beaches and fun in the sun but we are also coastal....which means increased risk of weather related problems. Over the years I've learned to keep an eye on the weather....not as much as my hubby....and stand ready. 
Last night the hubby's phone made this crazy "alert" sound...sort of a short siren. It was a Hurricane Warning alert.  Hermine, the latest storm to affect our lives was gathering strength. 

This is the latest radar picture of the storm. Not as big and nasty as Sandy, Gilbert, or Wilma but still something to demand respect. 
The storm has not made Category 1 Hurricane status but it has brought rain with it for days, 3 straight days of rain, making the ground soft and tree limbs heavy. Heavy tree limbs, and heavy trees, come down easy, knock out power, cause damage, and block roads. 


So where are we on the map? Right near the southern end of the purple part. Flooding is always a concern, especially in the low lying areas along the coast. The towns of Horseshoe Beach, Suwannee, and Steinhatchee require new homes to be on stilts but many of the older homes are still on the ground. Tornado activity is a possibility, too......a major problem especially for those living in mobile homes. 

The hubby and I work as a team with jobs according to our knowledge and ability. For the hubby this all means checking on friends and family and making sure they will be OK, getting the chain saw ready for big limbs and trees that come down, and making sure the vehicles are ready to roll if necessary. For me this means making sure the emergency supplies are ready...check....and having extra food, places to sleep, and things to do available for people who need shelter...check.
I'm as ready as I will ever be. 

Tuesday, August 30, 2016

Knitting and Crocheting Season

I have a hard time knitting or crocheting in the summer. I know, there are folks out there who can knit and crochet at the beach in 110 degree weather but I am not one of them. I have no desire to work with yarn until the weather cools off so I know when fall starts I'll be pulling out the yarn and start hooking...so to speak. 
So, for the folks out there who, like me, are getting ready to knit and crochet, I bring awesome patterns. Some of these patterns will be awesome for the new baby in your world, others perfect Christmas or Hanukkah gifts, and then, maybe something for yourself. 
Who knows where the needles and hooks may take you?


Knit Baby Booties from Leisure Arts has 14 patterns for baby booties. 
 This Leisure Arts booklet is filled with bootie patterns...baby booties, that is. Sweet little Mary Janes, boots, elf shoes (!), even saddle shoes bootie style. The patterns use sport yarn and US number 7 knitting needles. Hey, you can change the yarn and needles and make ornaments....just saying.
Crocheted Slippers for Women & Children from Leisure Arts. Seven patterns to crochet for the hookers (I just love that) in the world.
There is always someone who needs slippers during the winter and here's some great patterns to keep those toes warm. There are patterns for moccasins, espadrilles, sandals, and even fur-around-the-ankle-keep-the-toes-warm slippers. Even slippers from granny squares for those granny square addicts. The patterns use worsted weight yarn and hook size E to I. 

Crocheted Pillows from Leisure Arts Leaflet 282, 6 Designs in Worsted Weight Yarn from 1983. 
 These pillows have the retro look everyone is looking for. The patterns use worsted weight yarn and hooks from F to I. 
Clothespin Angel Ornament by Leisure Arts
Adorable ornaments using bedspread weight (size 10) thread and a clothespin. 
Leisure Arts 356 Slippers! 9 Styles
Keep those toes warm using a crochet hook and worsted weight yarn. 
Crochet Patterns by Herrschners' is full of patterns from easy to expert, ornaments to afghans.  Fourteen fantastic patterns to crochet including afghans, earmuffs, snowflake ornaments, and the gorgeous kissing ball on the front cover. 

Post by Eileen Patterson of GoofingOff Sewing, Pattern Haus, and Miss Eileen's Vintage. 

Sunday, August 28, 2016

Precious Moments Cross Stitch

Recently I came across some Precious Moments Cross Stitch Books.....a stack of them. They were designed by Gloria and Pat and most of them are first editions and first printings. Check out these lovelies.

Tell it to Jesus First Edition
Each book except one, has a number of patterns. 

Clowns, First Edition
Most of the books are First Edition or First Printing.
Birthday Wishes, First Printing
All are Precious Moments and look amazing.
Autumn's Praise, First Printing
The cross stitch charts can be used for needlepoint as well as cross stitch.
Deer Friends, First Printing
All the books are in excellent condition.

Kindness

Blessed Are Those Who Serve Our Country, First Printing


This is my personal favorite. I love a guy and gal in uniform. 
There's more Precious Moments books in the Pattern Haus shop. 

Post by Eileen Patterson of GoofingOff Sewing, Pattern Haus, and Miss Eileen's Vintage. 

Saturday, August 27, 2016

Repurposing Blue Jeans to Handbags

Not too long ago we had a visit from the little grands but as luck would have it, we had rain, lots of it for days. While one of the girls helped Grandpa build his race car in the garage, the other wanted to hang with Grandma. Keeping her entertained was challenging so we took a trip to the local thrift shop. I thought shopping for books and toys would help and that's where I spied a pair of blue jeans marked down to a quarter. I immediately thought of things to make from the jeans and bought them. 

We decided to make little handbags for the girls from the legs of the jeans.

We cut the legs off the jeans about 10 inches from the bottom. Using just the legs we turned the legs inside out, cut off the hems, and stitched across the narrow end and squared it off so it would have a flat bottom. We folded down the purse to the size we liked and added a rag rose and buttons for embellishments. 
For the handle we used the hems that we cut off earlier.


Rag rose and buttons on an embroidered bag.

Rag Rose and buttons.

Perfect size bags for little girls. 

Considering we used buttons on hand, scrap fabric for the roses, a whole twenty-five cents for the jeans we kept ourselves entertained for very little money and a little bit of time. The best part is we had 2 little happy girls with their stylish bags. 

Post by Eileen Patterson of GoofingOff Sewing. 

Thursday, August 25, 2016

The Beaded Bird

Happy, the Beaded Bird
Hi friends! It's been a while since I signed in but I just have to show my new work. I got a bit busy with things at home, like a diagnosis of breast cancer that took the wind out of my sails temporarily. Luckily the tumor was found during a routine mammogram and was very small. And double lucky for me because it didn't get to my lymph glands so I am doing a happy dance, albeit a dance with me holding the girls so they don't bounce while I dance. 
So, back to my new work. With all the doctor's visits and waiting rooms I thought I would need something to do. I took a crazy quilt class and that has lead me to all sorts of places. One place is making beaded bird ornaments.
The birds started as birds made from a recycled linen jacket found at the thrift shop. I love to re-purpose items and that sounded like the perfect thing for the jacket.....except the first birds looked like seals. Like throw me a fish seals and that wasn't what I was trying to do. 
After the birds sat around for a couple of years (yes, years), I looked at them again and took off the wings and started embroidering, then beading them. 

The first one was is cute so I started on another. 


Shalom Beaded Bird
Each bird is different, sort of "when the mood strikes" and "where the needle takes me." Shalom (which means Peace) is a WIP....work in progress. It's good to have them around. Takes my mind off things when I start to worry. 

Well, that's all for the moment. Got to finish Shalom. He needs a few beads. 
BTW, there is a sale going on at GoofingOff Sewing. All children's patterns are on sale. Next month starts the Costume Pattern Sale. Stop by early before someone grabs your faves at 30% off. 

Post by Eileen Patterson of GoofingOff Sewing. 


Tuesday, August 2, 2016

Reasons to Iron When You Sew

Sorry I haven't posted in a while. I had the opportunity to retire back in April and took it. Wonderful choice. Then I was diagnosed with breast cancer. Luckily it was caught very early. I will have surgery this week. Then my uncle became ill. Very ill and being the good niece that I am, I spent a lot of time with him. He is still sick but in rehab. One day at a time.
Anyway, I wrote a few posts a while back and thought maybe I should finish them. Here's one about one of my favorite chores, ironing. I like it better than mopping floors and cleaning toilets.

Years ago I remember my dad getting clothes out of the dryer and shaking them out. "Look, no wrinkles! No reason to iron," he said. Like magic the wrinkle were gone. There's a trick to that, though. Your presence is required to shake the wrinkles out as soon as the dryer is done. Really? I have to stay in one place and wait for the dryer? Hmmm...
When I went into the Air Force, he packed up the old family iron and sent it with me. Good thing. I found I could iron uniforms a lot better than I could polish and spit shine my shoes. Talk about trading labor. My iron was my ticket away from shoe polish and dirty fingernails.

For many people ironing is a chore. I refuse don't  iron my sheets or napkins (I know folks who think I am a slacker). I also don't like to iron my t-shirts or jeans. Such a slacker.  Most knit fabrics require little, if any, pressing to look good, however, there are a lot of other fabrics, even some knits, that benefit from a good press.

Ironing and pressing are a very important part of sewing and quilting.

Sewing, whether  sewing for clothing construction or any other project, requires the use of an iron and, preferably, an ironing board, though a table and a towel will work in a pinch. My iron and ironing board are standing on the ready at all times, plugged in when the sewing machine is going.
So, here goes, expert (sort of expert at least) advice about ironing.

Know your iron. Really. Know how to set the proper temperatures, how to use the steam setting if you like it (I don't like it), and how to fill the water reservoir. Know about the automatic shut off and how to reset it (nothing like a warm iron when you expect a hot one).

Handy-dandy ironing tools:
Press cloth: I love my press cloth. It is essential when pressing silks.
Spray bottle: I keep mine at the ready with water for those times a light misting is necessary. I heard a water/vinegar mix is good, too, but haven't tried it yet.
Ham and sleeve board: both nice to have but not essential.

When to iron:
Before sewing:
An iron is pretty handy to get the wrinkles out of patterns before placement on fabric for cutting. Use a barely warm setting.
Iron the fabric prior to pattern placement as well. Your pattern pieces will have a much better chance of accuracy.
Set your iron at the appropriate setting for the type of fabric you are using. I used to have an iron that had different settings but only one worked....very hot. I got good at used it, most of the time. Then there was the time the fabric melted as soon as the iron touched it. I bought a new iron.

While you sew:
Press your seams when you sew.....Quilters press to the dark side (ha ha ha..quilting humor), otherwise, press your seams open. Doing so sets the thread and decreases the chance of those aggravating little unwanted creases that appear. Always press your darts in place before sewing over them.
Take your pins out before ironing. Never iron over your pins. They could melt (if you are like me with plastic headed pins) or leave marks in the fabric.

After sewing:
Give the object a once over with your iron. The look will go from "not bad" to "Damn, I did good."

So, that's it in a nutshell. Love your iron. Be one with your iron. OK, a little too much but appreciate it. It's a great tool.

Post by Eileen of GoofingOff Sewing

Saturday, May 21, 2016

Sewing for the Mom to Be

Sorry it's been so long since I blogged but since I retired I think I am busier than ever before. I've even been able to clear a few things out of the UFO pile. Big accomplishment but that's another story and I will leave that for later. Today I listed a couple vintage maternity patterns in the Etsy store and thought I would give them a shout. They are too cute to leave them undiscovered.

Simplicity 7297 Maternity Sundress, Jumper, and Jumpsuit Size 6-14 Bust 30-36 inches. The dress and jumpsuit feature a raised waistline, side pockets, and a button front bodice.  

McCall's 7471 Maternity Sundress, Jumper, Blouse, and Jacket Size 14, bust 36 inches Designed by Evelyn de Longe. Jacket features patch pockets and top stitching. The sundress has a tucked front and shoulder straps. The pullover blouse has a Peter Pan collar and short sleeves.  

I don't know which one is cuter. Both patterns are just right for summer months. The Simplicity pattern is multi-sized....a big plus. The McCall's pattern has a jacket and blouse....great for cool evenings or air conditioned areas. 

Well, that's it for now. Have to tend to the cookies in the oven. The hubby has a steady stream of folks that stop into his garage and often have little ones in tow. A batch of cookies from Miss Eileen seems like the right thing to do. 

Post by Eileen of GoofingOff Sewing Supplies on Etsy. 

Wednesday, May 11, 2016

Braided Table Runner

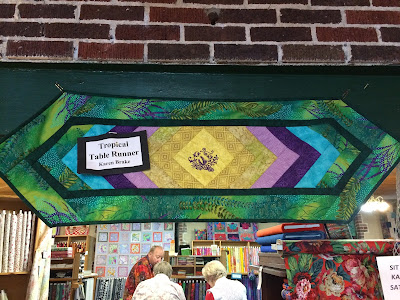
Tropical Braided Table Runner by Karen Brake. This beauty was hanging at the quilt shop.
Last week I decided to take advantage of my new found leisure time and attend a class at the Suwannee Valley Quilt Shop. Once a month they hold a Sit and Stitch...free....and teach a new method or project. This month was the Braided Table Runner.

We used a pattern, #GE-101, from GE Designs of Chanhassen, Minnesota. The runner is a "Quilt as you go" pattern. The finished table runner is 17 inches wide and 52 inches long (42cm x 130cm). 


Two examples of the table runner to inspire us.
The runner starts with a six inch square in the center. I used a light color for my center square to create a light-to-dark effect but that is not necessary. Karen, the class leader, used a dark center for a dark-to-light effect.

Before starting we basted the backing and binding together. We used very thin binding, very low loft, since a pouffy effect was not desired.
We then marked the center of the fabric to place the center square on point. This is a very important step.

The strips are added on to the ends, making a point at each end....sort of the opposite of a log cabin....points on the ends and open triangles on the sides. The strips are 2 1/2 inches wide with 4 strips of each color, two 6 inch and two 8 inch. The strips are sewn in place, on each end, with a 1/4 inch seam, then pressed.
Adding the border.
When the strips are all in place the first border goes on, first across the length meeting each triangle.


Carefully adding the border.
The ends of the border are next to keep the braided effect. The wide border goes on next in the same fashion, then the binding to complete the runner.
When we finished the class we weren't done with the runners but they were close enough for pictures. We had the basics down. 
Table runner in blue and purples.
Table runner in Gator colors...go Gators!


Karen, our class leader, with hers. 

And here's me with mine. 


Ta Da! The finished product. I used brown and sage green calicos for a vintage look. It will look good on my old, I mean antique, dining table. 
It wasn't too difficult but it did take concentration. I didn't pull my hair or chew my nails so I think I might do it again, maybe in blues for Hanukkah. Got to think on it. 

Happy Stitching!

Post by Eileen of GoofingOff Sewing....getting the UFO basket emptied out, one project at a time.