
I am in the mood to crochet. Like other crafty people, I know how to do a number of different crafts. I’m not really an expert at any but I can do a few things. I know how to knit a little, crochet a bit, and sew. My problem is I get distracted easily. I need to create when the mood is right. The pattern has to be challenging enough to get me interested but not too challenging to make me give up.
I have always been a recycler. I don’t like waste and plastic bottles of water make me cringe. I still buy them but cringe. I do have a refillable water bottle, though and thought it would be a great idea to get water bottles for my sisters and make holders to go with them. Since I am in the crocheting mood, it seemed a natural to buy some yarn and start hooking.
I used Peaches & Creme cotton yarn for each bottle. Each bottle uses a little less than 1 ball. I tried to complement the color bottle with the yarn. It’s been a while since I crocheted anything so I went to WikiHow to get me started.
Like the WikiHow article, you make a disk for the bottom of the bottle. Chain 6 stitches, slip stitch (sl st) to make a circle, and Rd 1 single crochet (sc)6 stitches into the circle. Rd 2 chain 2, then 2 sc into every stitch (total of 12 stitches in the 2nd rd), join the 11th stitch to the top of the chain with a sl st. Rd 3: Ch 2, *1 sc into 1st st, 2 sc into next st, continue until you reach the chain, sl st at top of chain. Rd 4: Ch 2, *1 sc in next 2 st, 2 sc into next st, continue until you reach the chain, sl st at top of chain. At this point the disk is probably big enough to fit the bottle, if not, crochet another round increasing the number of stitches with each round.
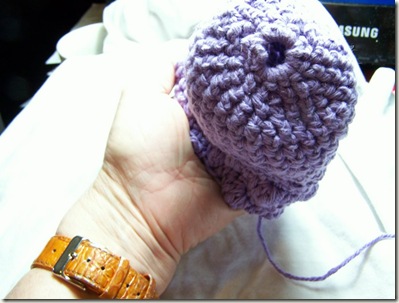

Once the disk is complete the creativity starts. You can use a simple sc stitch the entire way up until the cozy is tall enough. Simple sc lends itself well to embroidery or flowers. The one I made for my sister is done with a row of popcorn stitch alternating with 2 rows of half double crochet.

The handle starts with a chain of 40 stitches. I sc down 2 rows from the top and made a chain of 40 stitches. I then sc in each stitch of the chain and sc the end of the handle to the cozy to make it secure.

Here’s a picture of the completed cozy.

Just weave the loose threads in and it is done. Takes a few hours from start to finish. Good to do while watching TV or listening to music. Best of all, if I am stitching I’m not eating.
I liked making the cozies so much I made one for myself.

Simple single crochet stitch, scalloped trim at the top, and a crocheted flower for a little bit of embellishment.

Abbreviations: Rd: round, sc: single crochet, hdc: half double crochet, sl st: slip stitch, ch: chain, st: stitch.
My thanks to Dvortygirl, Lois Wade, Krystle, Eric, and anyone else involved in the article. http://www.wikihow.com/Crochet-a-Water-Bottle-Cozy
Post and patterns by Eileen Patterson of GoofingOff.etsy.com and GoofingOff.Artfire.com


